Wednesday, September 23, 2020

Permalink Change Not Working on Wordpress with Godaddy Windows Hosting

 Permalink Change - Not Working - Error 404


If you have Windows Web Hosting from GoDaddy & Wordpress site, you are likely to stumble upon this issue. 

All your pages open with PAGE ID and not with the given name. e.g. http://domain.com/?page_id12 It should look something like this & this is what we will achieve. http://domain.com/home

1st Step:

  1. You should always backup your site before making any changes.
  2. Log in to WordPress.
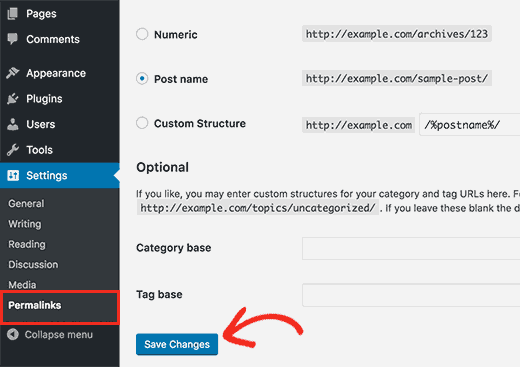
  3. Go to Settings > Permalinks
  4. Choose the permalink structure you prefer, or create a custom one. Note: OPTIONAL: You can also create a structure for your categories and tags.
  5. Click Save Changes.
  6. The URL on your website's pages should display the permalink settings you selected.
Modify it as below - You are likely to get an issue and an error 404 after that. 


Not To Worry

Now Let's perform this steps to fix this issue. 

Plesk/Windows

  1. Locate the web.config file.

    Note: If you do not have a web.config file then you can create one with your FTP client, or create one on your local computer and upload it to the hosting account.

  2. Edit the web.config file, and add the following if it is not already present to the configuration section:
    <?xml version="1.0" encoding="UTF-8"?>
    <configuration>
      <system.webServer>
        <rewrite>
          <rules>
            <rule name="WordPress Rule" stopProcessing="true">
              <match url=".*" />
              <conditions>
                <add input="{REQUEST_FILENAME}" matchType="IsFile" negate="true" />
                <add input="{REQUEST_FILENAME}" matchType="IsDirectory" negate="true" />
              </conditions>
              <action type="Rewrite" url="index.php" />
            </rule>
          </rules>
        </rewrite>
      </system.webServer>
    </configuration>
  3. Save the file, and upload it to your hosting account.

Your Issue Should get fixed now, Share your comment if that helps you.

Wednesday, August 12, 2020

Creating a Snapshot Alarm

Creating a Snapshot Alarm

An alarm can be created to display a warning or alert on a virtual machine if a snapshot grows to be larger than a threshold set in an alarm trigger.

To create a VM snapshot alarm for all virtual machines in a vCenter’s inventory select the vCenter Server. In the Manage tab select Alarm Definitions and click Add to start the Alarm Definition wizard. Give the alarm and name and description.


Add a new Trigger and select VM Snapshot Size for the Trigger.


Set the Warning Condition to the snapshot size in GB that should trigger a warning, in this example the size is set to 10 GB. Set the Critical Condition to the snapshot size in GB that should trigger a critical alert, in this example the size is set to 15 GB.

An action can be configure to send an email to an administrator if a warning or critical alarm is triggered.


The new VM Snapshot Size alarm is added to the alarm definitions.

If a snapshot grows to a size larger than what has been configured the alarm is triggered and the warning or alert is displayed on the VM and in the Alarms box in the Web Client.

Source:

Friday, June 26, 2020

SHAREPOINT - DELETED AND RECREATED USER DOESN’T HAVE PERMISSIONS TO SITE, ACCESS DENIED! Reused email causes SharePoint Issue

SHAREPOINT  - DELETED AND RECREATED USER DOESN’T HAVE PERMISSIONS TO SITE, ACCESS DENIED! Reused email causes SharePoint Issue

Problem

When onboarding a new employee for a customer, we ran into an issue when giving the new user access to sites in SharePoint. Assigning the license to the user and initially adding her to SharePoint went smoothly. But when it came to giving her site permissions (in the site settings), we ran into an issue.

The actual process of adding her to sites appeared to work – until you refreshed the user lists on that site. She wasn’t actually being added. We went through the process a few times, with the same result.

That’s when we noticed something funny – the new user wasn’t being added. An old user, however, WAS being added.

Root Cause 

It turns out – the old user being added was the key to figuring out what was going on.

This customer uses the first name@company for their email addresses and Office 365 aliases. The customer previously had an employee with the same name and the same email address who was no longer at the company.

When trying to add the new user, SharePoint was associating the email with the old user (who previously used on SharePoint) and pulling her in rather than the new user.

The old user had been deleted entirely from their Office 365 tenant. For some reason, despite that, the user wasn’t deleted entirely from SharePoint. When we talked to Microsoft, we were told it was a glitch in their system. Not great news, but it did mean there wasn’t anything we (or the customer) could’ve done differently while offboarding the old user.

How to Fix

This turned out to be an easy fix once the root problem was discovered. We just had to completely delete the old user from SharePoint.

To do this, we had to bring up the list of ALL users for each SharePoint site. The easiest way to get to this list is by replacing the last number In the URL for the site with zero. Once we were on that screen, we deleted the old user from each site (this had to be done individually).

Once the old user was deleted, the new user was added to the sites using the normal method.

  1. Browse to the site and edit the URL by adding the following string to the end of it: /_layouts/15/people.aspx?MembershipGroupId=0

    For example, the full URL will resemble the following: https://fabrikam.sharepoint.com/_layouts/15/people.aspx/membershipGroupId=0

  2. Select the person from the list, and then on the Actions menu, select Delete Users from Site Collection.

  3. Now add the user again following normal process & now the new profile should get picked up. 


Above issue occurs due to mismatch in PUID - Read More

Clear browser history

SharePoint uses browser caching in several scenarios, including in the people picker. Even when a user is fully removed, he or she may still remain in the browser cache. Clearing the browser history resolves this issue. For info about doing this in Edge,

Restore SharePoint Deleted Site

Restore SharePoint Deleted Site

When you delete a user in the Microsoft 365 admin center (or when a user is removed through Active Directory synchronization), the user's OneDrive will be retained for the number of days you specify in the OneDrive admin center. (For info, see Set the default file retention for deleted OneDrive users.) The default is 30 days. During this time, shared content can still be accessed by other users. At the end of the time, the OneDrive will be in a deleted state for 93 days and can only be restored by a global or SharePoint admin.

For info about using Files Restore to restore a OneDrive to a previous point in time, see Restore your OneDrive.

For info about restoring items from the recycle bin in OneDrive, see Restore deleted files or folders.

Restore a deleted OneDrive when the deleted user no longer appears in the Microsoft 365 admin center

If the user was deleted within 30 days, you can restore the user and all their data from the Microsoft 365 admin center. To learn how, see Restore a user in Microsoft 365. If you deleted the user more than 30 days ago, the user will no longer appear in the Microsoft 365 admin center, and you'll need to use PowerShell to restore the OneDrive.

  1. Download the latest SharePoint Online Management Shell.

     Note

    If you installed a previous version of the SharePoint Online Management Shell, go to Add or remove programs and uninstall "SharePoint Online Management Shell."
    On the Download Center page, select your language and then click the Download button. You'll be asked to choose between downloading a x64 and x86 .msi file. Download the x64 file if you're running the 64-bit version of Windows or the x86 file if you're running the 32-bit version. If you don't know, see Which version of Windows operating system am I running?. After the file downloads, run it and follow the steps in the Setup Wizard.

  2. Connect to SharePoint as a global admin or SharePoint admin in Microsoft 365. To learn how, see Getting started with SharePoint Online Management Shell.

  3. Determine if the OneDrive is available for restore

  • If you know the URL of the OneDrive, run the following command:
PowerShell
Get-SPODeletedSite -Identity <URL>
A user's OneDrive URL is based on their username. For example, 
https://microsoft-my.sharepoint.com/personal/user1_contoso_com. You can find their username on the Active users (or Deleted users) page in the Microsoft 365 admin center. 
  • If you don't know the URL of the deleted OneDrive, run the following command:
PowerShell
Get-SPODeletedSite -IncludeOnlyPersonalSite | FT url
  • If the OneDrive appears in the results, it can be restored.
  1. Restore the OneDrive to an active state:
PowerShell
Restore-SPODeletedSite -Identity <URL>
  1. Assign an administrator to the OneDrive to access the needed data:
PowerShell
Set-SPOUser -Site <URL> -LoginName <UPNofDesiredAdmin> -IsSiteCollectionAdmin $True

For more info about these cmdlets, see Get-SPODeletedSite and Restore-SPODeletedSite.

Permanently delete a OneDrive

After you recover the data you need from the OneDrive, we recommend that you permanently delete the OneDrive by running the following command:

PowerShell
Remove-SPODeletedSite -Identity <URL>

 Caution

When you permanently delete a OneDrive, you will not be able to restore it

Windows Administrator Level 1 Interview Question & Answers

 Windows Administrator Level 1 Interview Question & Answers What is an active directory?  An Active Directory (AD) is a directory ...