
Restore AD Active Directory User Account using LDAP
LDAP –
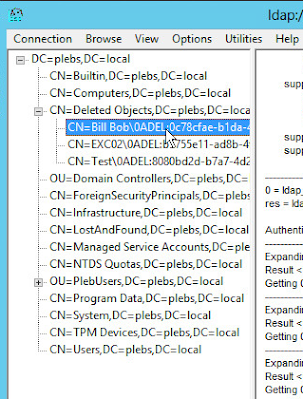
In this example I am going to delete the user account ‘Bill Bob’ and show you how I restored
it:

Open LDP.exe as an administrator

Once open click Connection, click Connect, type your servers name and port. LDAP uses port 636 or 389.

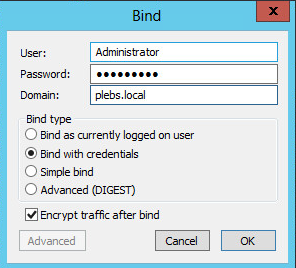
Click Connection, click Bind, and type the Administrator account and
password.
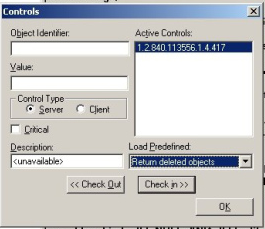
Click Options menu,
click Controls.
On Load Predefined, select Return deleted objects.
This option will show the Deleted Objects container that is
hidden by default.
Press OK
Click View, click Tree, and then select the distinguished name of the domain name.
Right click on the object, then click Modify.
In the Attribute box, type isDeleted. Under
Operation, click Delete, and
then click Enter.

Then type distinguishedName in the Attribute field, then type the original distuiguished
name of the user in the Values field, CN=Bill Bob,OU=PlebUsers,DC=plebs,DC=local. You can
restore to a different DN location.
Under operation, click Replace, and then click Enter.

Select the Extended check
box, and then click Run.
Now you restored the object it will be in Active Directory.
If you are getting LDP errors such as –
LOperation failed. Error code: 0x57
DAP: error code 12 – Unavailable Critical Extension
Go back into Options and Controls, double click on one of the Active Controls
and check it in. Whilst also making sure Load Predefined is
set to ‘Returned deleted
objects’ then try again. I have experienced random errors at times when
there are more than one active control, that took a little playing around in
the Controls area to resolve.

Otherwise if no errors appear – check AD and see if the
user is now back in it’s original OU.
However the results aren’t perfect, the account will be stripped
of all attributes. The account will need a password and to be re-enabled.

However, NTFS and share permissions will still be intact.

Hope this is helpful!


