Wednesday, January 22, 2020

Windows Installer Issue - McAfee and Windows Update Fix


Windows Installer Issue - McAfee and Windows Update Fix


This article covers an issue that occurs if you are trying to install any Application/Software on the server and you receive random errors related to Windows Installer.

If you try to install a program that uses the Windows Installer component in Windows Random Issues and Errors are reported in Event Viewer.


Installing or removing security updates or programs for Windows requires Windows Installer, but if the Windows Installer is damaged, corrupted or not registered, installing any security updates, McAfee or other programs may fail. Below are the steps to use to

Damaged or Unregistered Windows Installer

If you are unable to install McAfee and Windows Update fixes, the Windows Installer service that is included in Windows is either not registered or it is damaged. To resolve the problem, first re-register the Windows Installer service:


  • Click Start, click Run and then type cmd.exe in run box. The command prompt window will be displayed.
  • In command prompt window, type msiexec.exe /unregister and then hit the Enter key on the keyboard.
  • Next, type msiexec /regserver and then hit the Enter key again on the keyboard.
  • Try installing McAfee or any updates for Windows that you are trying to install.
  • If the above steps will not help, verify that the System has full control of the HKEY_CLASSES_ROOT hive in Windows registry:
  • Note: Using registry editor in Windows is for advanced-user only. Backup the registry before making any changes.
  • Click Start, click Run and then type regedit.exe in run box. The registry editor window will open.
  • In the left pane, right-click HKEY_CLASSES_ROOT and then click Permissions.
  • Make sure that System is in the Group or user names list, and that it has full control permission.

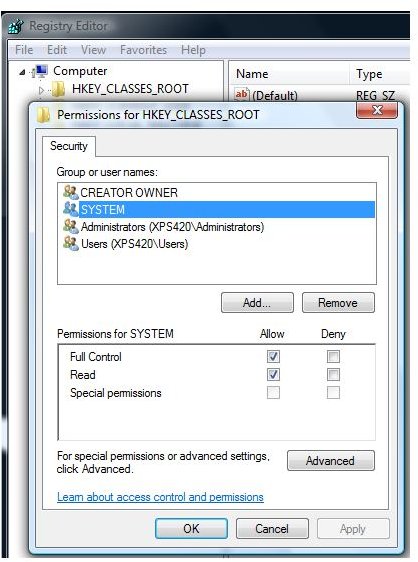
  • If System is not listed in the Group or user names list, click Add and ensure that the local computer name appears in the From this location box, type system in the Enter the object names to select box, click Check Names, and then click OK.

  • Give System full control permissions.
  • Restart the computer and try to install McAfee or any Windows update fixes that couldn’t be installed before using these steps.

Check out Amazing Smart Phones of 2020 to Buy Online


OPPO A7 (Glaze Blue, 3GB RAM, 64GB Storage) with No Cost EMI/Additional Exchange Offers

INR 9,990.00
More offers


OPPO F11 (Marble Green, 6GB RAM, 128GB Storage) with No Cost EMI/Additional Exchange Offers

INR 14,990.00
More offers


OPPO K3(Aurora Blue, 6GB RAM, AMOLED Display, 64GB Storage, 3765mAH Battery)

INR 15,990.00
More offers


OPPO A9 (Marble Green, 4GB RAM, 128GB Storage) with No Cost EMI/Additional Exchange Offers

INR 11,990.00
More offers


OPPO A5S (Green, 4GB RAM, 64GB Storage) with No Cost EMI/Additional Exchange Offers

INR 10,990.00
More offers


OPPO A7 (Glaring Gold, 3GB RAM, 64GB Storage)

INR 9,990.00
More offers


OPPO Reno2 Z (Luminous Black, 8GB RAM, 256GB Storage) with No Cost EMI/Additional Exchange Offers

INR 25,990.00
More offers


OPPO A9 (Fluorite Purple, 4GB RAM, 128GB Storage) with No Cost EMI/Additional Exchange Offers

INR 11,990.00
More offers


OPPO A5 2020 (Mirror Black, 3GB RAM, 64GB Storage) with No Cost EMI/Additional Exchange Offers

INR 11,990.00
More offers


OPPO A9 2020 (Vanilla Mint, 8GB RAM, 128GB Storage) with No CostEMI/Additional Exchange Offers

INR 18,490.00
More offers


Redmi Note 8 (Neptune Blue, 4GB RAM, 64GB Storage)

INR 9,999.00
More offers


Redmi 7A (Matte Blue, 2GB RAM, 16GB Storage)

INR 4,999.00
More offers


Samsung Galaxy M30s (Blue, 4GB RAM, 64GB Storage)

INR 12,999.00
More offers


Redmi 7A (Matte Black, 2GB RAM, 16GB Storage)

INR 4,999.00
More offers


Nokia 2.2 2/16 Black

INR 5,099.00
More offers


Redmi Note 8 Pro (Shadow Black, 6GB RAM, 128GB Storage with Helio G90T Processor) - Upto 6 Months No Cost EMI

INR 15,999.00
More offers


Nokia 6.1 Plus (Blue, 6GB RAM, 64GB Storage)

INR 11,874.00
More offers


Mi Redmi 6A (Black, 2GB RAM, 32GB Storage)

INR 5,425.00
More offers


Samsung Galaxy M20 (Ocean Blue , 4GB RAM, 64GB Storage, 5000mAH Battery)

INR 10,499.00
More offers


snowpack Genuine A1 Smart Watch Phone Camera SIM Card Pedometer Buy from Lotus ONLY- Black

INR 590.00
More offers

Event ID – 4227 - TCP/IP failed to establish an outgoing connection Event ID 4227


Event ID – 4227 - TCP/IP failed to establish an outgoing connection Event ID 4227


Check if decrease TcpTimeWaitDelay and increase MaxUserPort could help to solve the issue.
1. The location of the TcpTimeWaitDelay is:
HKEY_LOCAL-MACHINE\System\CurrentControlSet\Services\Tcpip\Parameters. Add REG_DWORD named TcpTimedWaitDelay, we may set the value to 30 seconds, by default, the value is 4 minutes.
Here is the detailed information about TcpTimedWaitDelay:
2. Then we may use command netsh int ipv4 set dynamicport tcp start=10000 num=20000 to expand dynamic port range.

Best of OPPO Phones to Buy in 2020


OPPO F15 (Lightening Black, 8GB RAM, 128GB Storage) with No Cost EMI/Additional Exchange Offers

INR 19,990.00
More offers

OPPO F11 (Marble Green, 6GB RAM, 128GB Storage) with No Cost EMI/Additional Exchange Offers

INR 14,990.00
More offers

OPPO F15 (Unicorn White, 8GB RAM, 128GB Storage) with No Cost EMI/Additional Exchange Offers

INR 19,990.00
More offers

OPPO A9 2020 (Vanilla Mint, 8GB RAM, 128GB Storage) with No CostEMI/Additional Exchange Offers

INR 18,490.00
More offers

OPPO A9 (Fluorite Purple, 4GB RAM, 128GB Storage) with No Cost EMI/Additional Exchange Offers

INR 11,990.00
More offers

(Renewed) OPPO R15 Pro (Cosmic Purple, 6GB RAM, 128GB Storage)

INR 11,678.00
More offers

OPPO A9 (Marble Green, 4GB RAM, 128GB Storage) with No Cost EMI/Additional Exchange Offers

INR 11,990.00
More offers

OPPO A92020 (Vanilla Mint, 4GB RAM, 128GB Storage) with No Cost EMI/Additional Exchange Offers

INR 15,990.00
More offers

OPPO A7 (Glaze Blue, 3GB RAM, 64GB Storage) with No Cost EMI/Additional Exchange Offers

INR 9,990.00
More offers

OPPO A5 2020 (Dazzling White, 3GB RAM, 64GB Storage) with No Cost EMI/Additional Exchange Offers

INR 11,990.00
More offers

Sunday, December 22, 2019

How to fix BSOD Windows Update Error 0x80070422


How to fix BSOD Windows Update Error 0x80070422


The Error "0x80070422" occurs when you install and update a patch and it could not start


Step 1 --

First of all, double click on the windows update file. You will be prompted with an error informing you that the "Installer encountered an error: 0x80070422". Click on the ok button to exit the pop up.

Step 2 -- Open services

Now let's troubleshoot the problem. Open the start menu and in the search bar, type services.msc and hit enter.

Step 3 -- Open properties of the service

As a result, the services window will open up. Scroll down and right click on the Windows Update service and open its properties.

Step 4 -- Change startup type

Once the properties open, change the startup type and set it to Automatic and click on Apply.

Step 5 -- Set recovery option for first time failure

Now go to the recovery tab and select the restart service option for the First Failure.

Step 6 -- Start the service

Now go back to the General tab and click on the Start button to start the Service.

Step 7 -- Save the changes

Click on the Apply button to save the changes made and then close the services window.

Step 8 -- Run windows update file without an error

Run the windows update file again and this time, the Windows update will start without an error. In this manner, you have successfully resolved the BSOD windows update error 0x80070422.


Best Of Electronics

Monday, November 25, 2019

Failover Cluster Step-by-Step Guide: Configuring Accounts in Active Directory

Failover Cluster Step-by-Step Guide: Configuring Accounts in Active Directory


Steps for troubleshooting password problems with the cluster name account

Use this procedure if there is an event message about computer objects or about the cluster identity that includes the following text. Note that this text will be within the event message, not at the beginning of the event message:
Logon failure: unknown user name or bad password.
Event messages that fit the previous description indicate that the password for the cluster name account and the corresponding password stored by the clustering software no longer match.
For information about ensuring that cluster administrators have the correct permissions to perform the following procedure as needed, see Planning ahead for password resets and other account maintenance, earlier in this guide.
Membership in the local Administrators group, or equivalent, is the minimum required to complete this procedure. In addition, your account must be given Reset password permission for the cluster name account (unless your account is a Domain Admins account or is the Creator Owner of the cluster name account). The account that was used by the person who installed the cluster can be used for this procedure. Review details about using the appropriate accounts and group memberships at http://go.microsoft.com/fwlink/?LinkId=83477.

To troubleshoot password problems with the cluster name account

  1. To open the failover cluster snap-in, click Start, click Administrative Tools, and then click Failover Cluster Management. (If the User Account Control dialog box appears, confirm that the action it displays is what you want, and then click Continue.)
  2. In the Failover Cluster Management snap-in, if the cluster you want to configure is not displayed, in the console tree, right-click Failover Cluster Management, click Manage a Cluster, and select or specify the cluster you want.
  3. In the center pane, expand Cluster Core Resources.
  4. Under Cluster Name, right-click the Name item, point to More Actions, and then click Repair Active Directory Object.

Sunday, November 10, 2019

KB2918614 Fails to Install & Requires MSI 4.5 Version – Windows Server 2003


Microsoft Security Bulletin MS14-049 - Important


Vulnerability in Windows Installer Service Could Allow Elevation of Privilege (2962490)


Knowledge Base Article

Knowledge Base Article2962490

Update FAQ

I am running Windows Server 2003 and install updates manually. Are there any prerequisites for installing the 2918614 update?

Yes. Customers who are running Windows Server 2003 and who install updates manually must install Windows Installer 4.5 before installing the 2918614 update. Windows Installer 4.5 will be installed automatically for customers who have automatic updating enabled. For more information about the prerequisite Installer update, see Microsoft Knowledge Base Article 942288.


Issues after this update.

Require Users to Press CTRL+ALT+DEL to Approve UAC Elevation


Require Users to Press CTRL+ALT+DEL to Approve UAC Elevation

When I try to use Ctrl-Alt-Del with my on-screen keyboard, I get an error message about clicking my user tile. What and where is this user title?


Resolution:

To use the commands available when you press ctrl+alt+del click your user tile and choose an option

If you are getting this error, you are probably trying to reset the password and this should help:

This procedure is the only one which worked for me on a Windows 2012 R2 RDP session:


  1. Click Start.
  2. Type osk (to bring up the on screen keyboard)
  3. Hit enter.
  4. Once the on screen keyboard is open, hold ctrl+Alt on your physical keyboard, then click on the del key in the on screen keyboard.
  5. Minimize the on screen Keyboard.


Credit: http://rajdude.com/blog


Thursday, October 10, 2019

How to fix a compromised (hacked) Microsoft Office 365 account

How to fix a compromised (hacked) Microsoft Office 365 account


Verify that the users machine is not compromised

Make sure the user has anti-malware software installed, running and that it's up-to-date. If you do not have malware software installed, you can download a free solution from the Microsoft Protection Center. You can also use the Malicious Software Removal Tool to scan your computer for malware. In cases where these recommendations are not enough, you should follow the Advanced Troubleshooting steps.

Remediation Steps:

  • Reset password (this secures the account and kills active sessions).
  • Remove mailbox delegates.
  • Disable mail forwarding rules to external domains.
  • Remove global mail forwarding property on mailbox.
  • Enable Multi-Factor Authentication (MFA) on the user's account.
  • Set password complexity on the account to be high.
  • Enable mailbox auditing.
  • Produce Audit Log for the admin to review.
Resolution Steps: 

Issue – O365 user unable to send emails due to “Potentially Compromised Account’ Error.

Resolution

  1. Login to O365 Admin Portal
  2. Go to “Exchange”  in Admin Centers
  3. Now go to  “Protection”
  4. In Protection Page Search for the Restricted User
  5. In the End There is “Actions” Section Click on Unblock – This will allow user to send out emails

Windows Administrator Level 1 Interview Question & Answers

 Windows Administrator Level 1 Interview Question & Answers What is an active directory?  An Active Directory (AD) is a directory ...