Wednesday, September 23, 2020

Permalink Change Not Working on Wordpress with Godaddy Windows Hosting

 Permalink Change - Not Working - Error 404


If you have Windows Web Hosting from GoDaddy & Wordpress site, you are likely to stumble upon this issue. 

All your pages open with PAGE ID and not with the given name. e.g. http://domain.com/?page_id12 It should look something like this & this is what we will achieve. http://domain.com/home

1st Step:

  1. You should always backup your site before making any changes.
  2. Log in to WordPress.
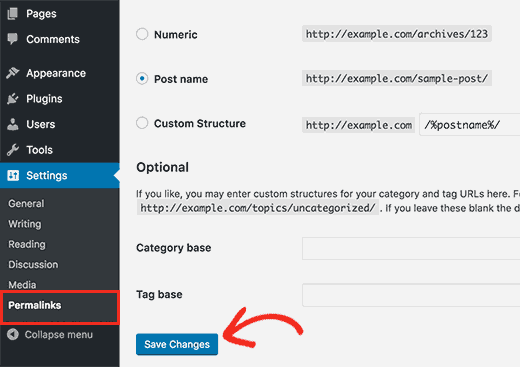
  3. Go to Settings > Permalinks
  4. Choose the permalink structure you prefer, or create a custom one. Note: OPTIONAL: You can also create a structure for your categories and tags.
  5. Click Save Changes.
  6. The URL on your website's pages should display the permalink settings you selected.
Modify it as below - You are likely to get an issue and an error 404 after that. 


Not To Worry

Now Let's perform this steps to fix this issue. 

Plesk/Windows

  1. Locate the web.config file.

    Note: If you do not have a web.config file then you can create one with your FTP client, or create one on your local computer and upload it to the hosting account.

  2. Edit the web.config file, and add the following if it is not already present to the configuration section:
    <?xml version="1.0" encoding="UTF-8"?>
    <configuration>
      <system.webServer>
        <rewrite>
          <rules>
            <rule name="WordPress Rule" stopProcessing="true">
              <match url=".*" />
              <conditions>
                <add input="{REQUEST_FILENAME}" matchType="IsFile" negate="true" />
                <add input="{REQUEST_FILENAME}" matchType="IsDirectory" negate="true" />
              </conditions>
              <action type="Rewrite" url="index.php" />
            </rule>
          </rules>
        </rewrite>
      </system.webServer>
    </configuration>
  3. Save the file, and upload it to your hosting account.
Your Issue Should get fixed now, Share your comment if that helps you.

Wednesday, August 12, 2020

Creating a Snapshot Alarm

Creating a Snapshot Alarm

An alarm can be created to display a warning or alert on a virtual machine if a snapshot grows to be larger than a threshold set in an alarm trigger.

To create a VM snapshot alarm for all virtual machines in a vCenter’s inventory select the vCenter Server. In the Manage tab select Alarm Definitions and click Add to start the Alarm Definition wizard. Give the alarm and name and description.


Add a new Trigger and select VM Snapshot Size for the Trigger.


Set the Warning Condition to the snapshot size in GB that should trigger a warning, in this example the size is set to 10 GB. Set the Critical Condition to the snapshot size in GB that should trigger a critical alert, in this example the size is set to 15 GB.

An action can be configure to send an email to an administrator if a warning or critical alarm is triggered.


The new VM Snapshot Size alarm is added to the alarm definitions.

If a snapshot grows to a size larger than what has been configured the alarm is triggered and the warning or alert is displayed on the VM and in the Alarms box in the Web Client.

Source:

Windows Administrator Level 1 Interview Question & Answers

 Windows Administrator Level 1 Interview Question & Answers What is an active directory?  An Active Directory (AD) is a directory ...